Xware+Aria2+qBittorrent离线下载组合
VPS离线下载,这次不使用docker,常规安装,大家可能好奇为什么部署3个,原因在于:
Aria2无法下载ed2k链接;
qBittorrent仅能下载磁力和种子,且较为突出;
Xware可下载ed2k电驴。
因此,普通http及bt磁力下载使用aria2,bt磁力不动,改用qbittorrent,碰到电驴ed2k链接使用迅雷。
脚本安装Aria2
1 | wget -N --no-check-certificate https://raw.githubusercontent.com/ToyoDAdoubiBackup/doubi/master/aria2.sh && chmod +x aria2.sh && bash aria2.sh |
运行脚本后会出现脚本操作菜单,选择并输入1就会开始安装,安装过程按回车安装最新版本。
使用说明
进入下载脚本的目录并运行脚本
1 | ./aria2.sh |
1 | Aria2 一键安装管理脚本 [vx.x.x] |
如果找不到配置文件,可卸载后再安装。
其他操作
1 | service aria2 start #启动 |
配置文件:/root/.aria2/aria2.conf
(配置文件包含中文注释,但是一些系统可能不支持显示中文)
下载目录:/usr/local/caddy/www/aria2/Download
(备用地址下载的默认为/usr/local/caddy/www/file)
AriaNg下载界面
安装完可以通过AriaNg来添加下载任务,AriaNg是纯 html & javascript 开发, 所以其不需要任何编译器或运行环境. 只要将 AriaNg 放在Web服务器里并在浏览器中打开即可使用。
我把代码放在GithubPages上,大家可以体验一下,因为是静态网页,也不会采集你的信息。
打开页面后,点击AriaNg设置-RPC,依次填入你的RPC地址,端口号(默认6800),和RPC密钥(默认doub.io),再点重新加载,即可连接到你的服务器。
【我的地址非Https,因为如果你的服务器是Http,而AriaNg是https的话,RPC协议就无法使用Http,会导致你的服务器连不上】
官方安装qBittorrent
1 | sudo yum install -y qbittorrent-nox.x86_64 |
创建systemctl脚本
1 | sudo vi /usr/lib/systemd/system/qbittorrent.service #粘贴下面 |
1 | [Unit] |
Esc,:wq,Enter
重新加载systemctl
1 | sudo systemctl daemon-reload |
接受用户协议
1 | sudo qbittorrent-nox #按y,然后回车,最后ctrl+c |
启动qbittorrent服务
1 | sudo systemctl start qbittorrent |
设置开机启动
1 | sudo systemctl enable qbittorrent |
浏览器打开http://ip:8080初始用户admin,初始密码adminadmin
登陆后在option中WebUI修改语言为简体中文,save,并执行sudo systemctl restart qbittorrent重启生效
忘记密码
打开~/.config/qBittorrent/中的qBittorrent.conf文件
找到WebUI\Password_ha1这一行,删掉,restart一下qbittorrent
仍然不行可以把WebUI\user=admin这一行也删掉,restart一下qbittorrent。
Xware迅雷远程下载
1、创建安装路径(我的是/data/xware),赋予读写权限,下载Xware软件并上传到该目录
1 | mkdir /data/xware |
2、进入安装目录,解压Xware
1 | cd /data/xware |
3、安装依赖
1 | yum -y install glibc.i686 |
4、启动Xware,2个命令都可以
1 | ./portal |
或者输入这条命令/data/xware/portal
启动成功后会得到 激活码,如下所示:
1 | [root@service xware]# ./portal |
这里说一下,有可能会失败很多次,我安装成功的2次,都在下午。
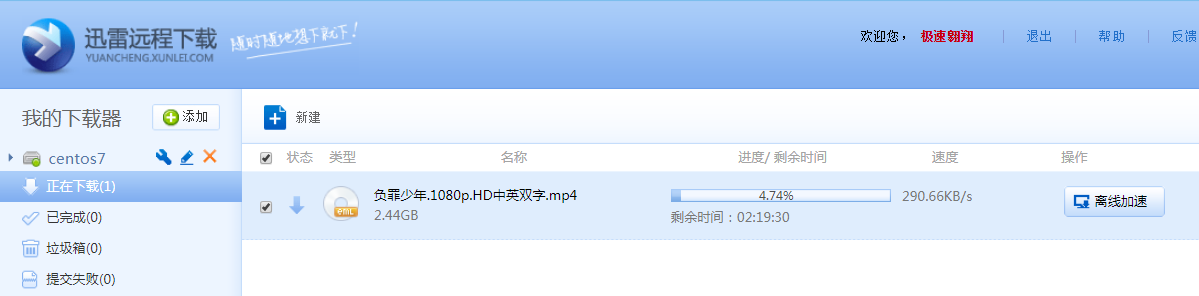
5、访问并登陆 yuancheng.xunlei.com,点击左边的添加然后输入激活码进行绑定。
6、找一个空余容量大的目录来挂载下载目录(默认下载路径为 /mnt,容量小)
创建下载保存路径(已有可忽略)
1 | mkdir /data/filerun/xware |
进入 /mnt 目录,创建相同的下载文件夹
1 | mkdir /mnt/download |
挂载(将 /data/filerun/xunlei 挂载到 /mnt/download)
1 | mount --bind /data/filerun/xware /mnt/download |
8、设置开机挂载下载路径并启动 Xware
1 | vi /etc/fstab #开机自动挂载下载目录 |
1 | vi /etc/rc.d/rc.local #开机自动运行远程迅雷 |
9、在 yuancheng.xunlei.com,点击新建任务,进行测试。
下载地址设置
为了方便统一管理,我把地址都放在了filerun目录里的文件夹
/data/filerun/qb/
/data/filerun/aria/
/data/filerun/xware/
本文参考了
 微信
微信- 支付宝